AlertDialogをカスタマイズ
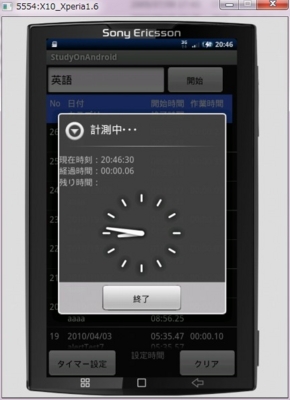
AlertDialogに時計を表示したかったので、ちょっといじってみました。
写真では、DigitalClock(現在時刻)とAnalogClockを表示しています。
経過時間は、現在時刻の値が変わった時のChangeイベントでカウントアップ処理をしています。
残り時間は未実装です。
ぐでぐでのコーディングになってしまいましたが、一応ソースはコチラ↓
ActionAlertDialog.java
public class ActionAlertDialog extends AlertDialog implements DialogInterface{

	private Calendar cal;

	private LinearLayout layout;

	private TextView textView;

	long countSecond = 0;

	public ActionAlertDialog(Context context) {
		super(context);
		setTitle("計測中・・・");

		layout = new LinearLayout(context);
		layout.setOrientation(LinearLayout.VERTICAL);

		DigitalClock dc = new DigitalClock(context);
		dc.addTextChangedListener(textWatcher);
		LinearLayout hbox = new LinearLayout(context);
		TextView text = new TextView(context);
		text.setText("現在時刻:");
		hbox.addView(text);
		hbox.addView(dc);

		LinearLayout hbox2 = new LinearLayout(context);
		TextView text2 = new TextView(context);
		TextView elapsed = new TextView(context);
		elapsed.setId(1);
		textView = elapsed;
		text2.setText("経過時間:");
		hbox2.addView(text2);
		hbox2.addView(elapsed);

		LinearLayout hbox3 = new LinearLayout(context);
		TextView text3 = new TextView(context);
		TextView remain = new TextView(context);
		remain.setId(2);
		text3.setText("残り時間:");
		hbox3.addView(text3);
		hbox3.addView(remain);

		layout.addView(hbox);
		layout.addView(hbox2);
		layout.addView(hbox3);
		layout.addView(new AnalogClock(context));
		setButton("終了", onClickListener);

		cal = Calendar.getInstance();

		setView(layout);
	}

	private TextWatcher textWatcher = new TextWatcher() {

		@Override
		public void onTextChanged(CharSequence s, int start, int before, int count) {
			if (count > 1) {
				textView.setText(setElapsedTime());
				countSecond += 1000;
			}
		}

		@Override
		public void beforeTextChanged(CharSequence s, int start, int count,
				int after) {
		}

		@Override
		public void afterTextChanged(Editable s) {
		}
	};

	/**
	 * 経過時間をhh:mm.dd形式で返却
	 * @return 経過時間
	 */
	private String setElapsedTime() {
		cal.setTimeInMillis(countSecond);
		return (setZeroPad(cal.get(Calendar.HOUR)) + ":"
                      + setZeroPad(cal.get(Calendar.MINUTE)) + "."
                      + setZeroPad(cal.get(Calendar.SECOND)));
	}

	private String setZeroPad(int value) {
		if (value < 10) {
			return "0" + Integer.toString(value);
		}
		return Integer.toString(value);
	}

	private OnClickListener onClickListener = new OnClickListener() {

		@Override
		public void onClick(DialogInterface dialog, int which) {
			dialog.dismiss();
		}
	};
}
コンストラクタのViewの生成は、本当はLayoutInflaterを使ってxmlから取得した方がいいのですが、
どうも上手くいかなかったのですっぱり諦めましたw
(2010/06/10追記:xmlを取得するように修正しました → 2010/06/06の日記)
ソース上でViewを生成したので、経過時間TextViewの変数を設定して表示処理の時に利用しています。
setId(1)とかで割り当てて、後でfindViewById(1)で取得する方法もアリかもしれません。
経過時間のカウントアップは、現在時刻のDigitalClockにaddTextChangedListenerを設定し、
テキストの値が変わったかどうかを調べるTextWatcherというものを使って拾えました。
DigitalClockは1秒毎にTextWatcherのonTextChangedに入るので、そこでカウントアップ処理と経過時間の表示処理をしています。
ボタンについては1つしかないので、DialogInterface.OnClickListenerのonClickでそのままダイアログを閉じてます。
複数のボタンを実装する場合は処理を分ける必要があります。
private OnClickListener onClickListener = new OnClickListener() {

	@Override
	public void onClick(DialogInterface dialog, int which) {
		//ダイアログを閉じる
		dialog.dismiss();
	}
};
メイン画面での拡張したAlertDialogの呼び出し↓
/**
 * アラートダイアログを表示
 */
private void showAlertDialog() {
	ActionAlertDialog dialog = new ActionAlertDialog(this);
	dialog.setOnDismissListener(onDismissListener);
	dialog.show();
}

private DialogInterface.OnDismissListener onDismissListener = new DialogInterface.OnDismissListener() {

	@Override
	public void onDismiss(DialogInterface dialog) {
		//タイマー終了
	}
};
閉じた時の処理は、DialogInterface.OnDismissListenerのonDismissで実装します。
